Wednesday, December 1, 2010

Yellow Brick road and Noel quilts

Life has been busy the last month, went to the Houston Quilt Festival and made two (small and easy) quilts. In the middle of October I went to the Pacific International Quilt Festival and picked up the Noel quilt kit. I had seen it in various magazines and fell in love with the center panel. Once I got the kit I discovered the pattern called for fusing the triangles to the squares to make the trees. Not happening. I used the Tri rec tool to make them instead, much happier without the raw edge applique! Squaring up the center panel was a bit tricky, since it was warped, but I managed in the end. Quilting was another adventure, how to do it? Finally went with "in the ditch", only the ditch is really the printed lines for the most part, and a tree shape in the tree blocks.

A friend of mine decided to make a Yellow Brick Road (Atkinson Designs) for a baby quilt, so when I needed to make a baby quilt too, this pattern was already in my brain. I made a large one a year or so ago, so I found my pattern, some fat quarters, and went to work. I used 10 fat quarters to get a decent sized baby quilt with no borders, then another 8 fat quarters and leftover bits from the front to piece the back. After quilting and trimming the backing I used the trimmed bits to make the binding. Love the fabric, was going to use it for a pieced bit of clothing, but I think it is perfect for a little girl's quilt. Quilted with Warm and Natural batting, King Tut #905 thread on the top and Masterpiece #147 on the back.

Tuesday, October 26, 2010

Farmer's wife Sampler blocks are done!

When I get close to the end of the block piecing I tend to have a final spurt of energy, and so it was with FWS. A variety of methods were used, but mostly using Marti Michell templates, and a bit of strip piecing, and finally paper pieced about three of them.
This top picture shows all of them on my new design "shade", the vanishing design wall. It pulls down quite a ways more (twice as long as it is wide), but not so easily with the sewing cabinet in front of it!


Friday, October 22, 2010

Baby quilt done


Another baby quilt from Lickety-Split Quilts for Little Ones by Laurie Bevan, this one started square, but got turned rectangular by adding another row on the top and the bottom. I played around in EQ before deciding on this variation. Fabrics are Kaffe Fassett's Roman Glass (two colorways) and Splash (Blank textiles).
Believe it or not, I mostly used Marti Michell templates for this quilt, except for the large center square and the large quarter square triangles, those I printed from EQ and used a MM template to trim the points so all the pieces went together nicely (without rabbit ears).

Tuesday, October 19, 2010

Placemats and shutters

Placemats are ready to be quilted! I made two variations, four each. Now to decide how to quilt them. I decided to bind them after all, rather than flip inside with a turning hole. Still debating on the binding fabric, but it could easily be the lightest fabric, which is also the napkins. Need more wooly thread for the serger, it takes two and I only have one spool each of two possible colors (which aren't quite the colors either). The checked fabric is the backing for six of the placemats. Need something for the other two.


You can barely see my new mats (from Martelli), gotten at PIQF. They cover the table nicely (moved the Alto cutting system to the old cutting table). they have different colors on each side, yellow for dark and purple for light. So far I like them a lot.
The shutters are installed! Now I don't live in a fishbowl when in the sewing room. It is a converted garage, so faces the street, and cardboard in the windows was getting old. Also have the track lighting installed. You can't see it in the dark picture at the bottom, but it goes around the room, lighting the work areas and the storage cabinets, with three different controls, which are also dim-able.


Last night I was looking at Annie Smith's blog (http://simplearts.com/blogs/), and she said it took her two weeks, 40 hours per week, to sort through her stash. So I figure it will take me to the end of the year, since I also have a day job. Which I better get to!

Tuesday, October 5, 2010

Placemats

While sorting through things I rediscovered the fabric I bought a "while back". I used some of it to make the triangle table runner late last year (I think) and hoped to make some placemats and napkins with the rest of it. Rather than just storing it again, I decided to just do it! found a very easy placemat idea online and went for it. I needed another fabric in order to make 8 placemats with the same coloring, but found some in the stash pretty quickly. One is pieced, and one is partially sewn, and the rest are cut into strips. I cut the strips with my Martelli rotary cutter, 8 layers of fabric, and used the Alto cutting system. Made very quick work of the cutting, love it! No pictures yet, but soon. I'll need to dig out the serger for the napkins. Retiring some placemats the other day probably helped me along in the decision to make some more. And now I don't need to find a place to store that fabric!
"http://www.quiltcetera.com/Tutorials/Tutorials/placemats.html" is where I found the placemat pattern.

Saturday, October 2, 2010

Sewing room usable

Progress has been made! While not everything has been sorted and put away, OK, very little sorted, and a bunch put away, I can actually start sewing in here. The cutting table has been cleared, the Alto has a space, along with the other mats on top of the new cutting island. I'd like the mats to fit better, but they will work. You can see the old cutting island (buffet) in the back of the picture. You can see it is taller than the new island, but DH says he can lift the new one to be the same height. At some point the buffet will turn into a pressing station, I think. The plywood on top of it will be trimmed and turned into a large pressing board.
The quilt hanging from the cabinets is trying to inspire a quilting design. Finished the top ages ago, but never quilted it.

Right now I put my pressing board on top of several project totes, which is close by the sewing station. A couple of things are actually there now, the pressing board and a June Tailor Square n' Block, which doesn't really work for pressing all that well (too cushy), but I do use it for a small design wall. The hole between the totes gives access to the plug outlet in the floor. My Civil War Diary and Baltimore Christmas stuff are in the small satchels between the totes.

Sewing station with easy access to the computer. I watch DVDs on it now, someday will get a TV in here too. Still need to bring in the printer. In back of the monitor, more totes with projects to be started.

The back side of the cutting table, finally found a spot where the file boxes can go. Thread on the floor was displaced with the boxes, it needs to find a new home.

The room is shaping up, now to sew a bit!

Tuesday, September 28, 2010

Sewing Room coming along


The room being filled with fabric totes, and my treadle base I use as an end table. I do have the machine, but need to work on it to get it to sew. I actually have another working treadle, but it is staying in the living room for the time being.

The entry way to the room, the rug will be moved closer to the cabinets when they are done, and will have my rocking chair on it. Right now it is being used as padding while my DH assembles furniture.

My DH has been very busy assembling furniture from IKEA. One of the first things he built was the VARDE kitchen cabinet with all of the drawers. It has another piece backing it with shelves and will be my cutting island. The drawers have a lot of thread in them so far, and my Bernina accessories, manuals, Marti Michell templates, other specialized templates, and two empty drawers.

You can see the fabric storage cabinets, one more to go, then I need to figure out how to store all of the stuff I want to keep in this room. Some will have to go . At the end of the storage cabinets is a HEMNES bookcase. Another one, with glass doors, is at the opposite end of the room.
Too many magazines, will be purging them too, keeping anything that looks interesting in sheet protectors in a binder. Haven't done that for about 7 years, time to do it again!

A quilt finish

We are having a fundraiser at work to benefit Second Harvest Food Bank and Toys for Tots. Since I work in the space biz, I thought the space panel would be a good jumping off point.

It is only a panel, and I wanted lap size, so played around in EQ and came up with an Attic Windows layout. The Stonehenge fabric worked perfectly with the colors in the panel (used for the window frame).

I like a skinny border before the final border, but didn't want to find more fabric for this, so went with the double skinny border, and I like it! When it got put on the center, I sewed the border strips together first, pressing some in and some out, so when I mitered the corners they snugged together nicely. I give it away on Thursday, hopefully to a good home.

Thursday, September 9, 2010

Sewing Room update

Yesterday and today we got doors! They are not finished yet, still in the raw state, but there are locks on the outside doors and I can now walk from the house into the sewing room without going outside.
New front door, we have been wanting one for a while, new light will replace the dangling one... We are replacing the ugly rock with brick and stucco, so far only the rock has been removed. Soon you won't see the old insulation coming out of the framing.

This is the side door into the sewing room, where my friends can come without going through the house.

This is the door from the porch to the utility room, not exciting.

Finally, a door from the house into the sewing room, so I can sew in my jammies.

The room was also painted a lovely shade of blue, precious dewdrop. But, they neglected to prime the old wall, and it needed it. So, we will see what they do now.

Sunday, September 5, 2010

Farmer's Wife Sampler - 96 done now!

Three of these I finished last weekend, and three I finished today.
67 Pine Tree was done with paper piecing.

74 Ribbons - used marti Michell templates, trimming a rectangle to get the paralleogram. I pressed the lighter parellogram out, and the darker one in, so that piecing them together went together pretty easily.

76 Sawtooth - Paper pieced

77 Seasons - debated about templates, but went with paper piecing.

98 Waterwheel - Marti Michell templates

99 W.C.T.U (Women's Christian Temperance Union) - Cut with Marti Michell Templates.

Sewing Room Status

Still no doors, but they did get delivered on Friday and I have hopes that they will be installed next week. And also the walls and ceiling should get painted. I picked out Precious Dewdrop (Kelly Moore) for the walls, and Swiss coffee for the trim and ceiling. Storage shrunk a little with the extension into the room that is around the electrical box. There will be a bookcase in front of it, and then the high cabinets (probably from IKEA) that will hold all of the boxes of fabric that are currently in back of my couch. Lots of boxes.
Right now I am thinking about switching the orientation of my sewing cabinet, so that it faces the room, and the TV. Will need to play around with the layout to see if that will work.


Sunday, August 22, 2010

90 blocks done for the Farmer's Wife Sampler quilt

Plugging away here and there, here are some of the latest attempts.
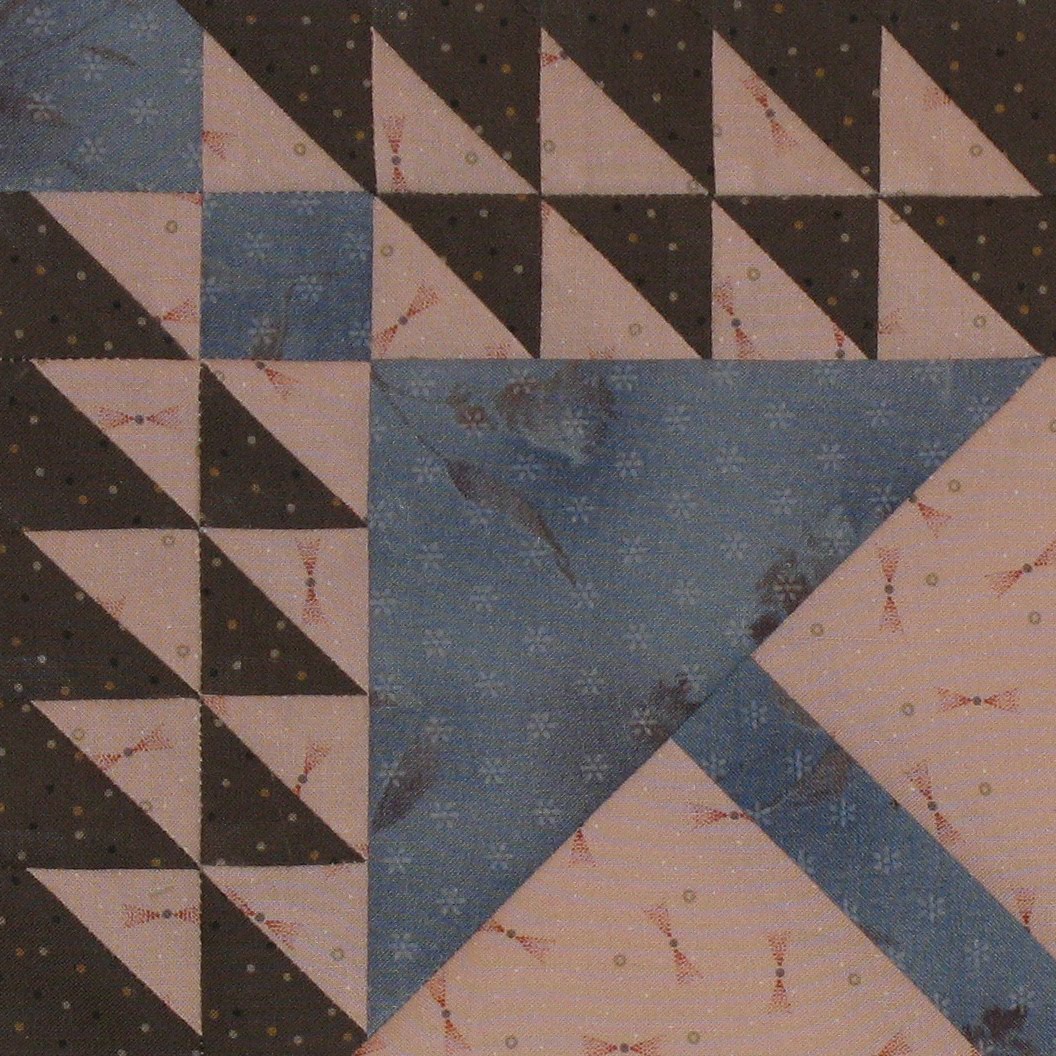
64 Peace and Plenty - made up of lots of 1 1/2" HST (and so is the next block). For a change of pace, I didn't use Marti Michell templates. Instead I cut squares 2 1/2" of each fabric, put right sides together, stitched 1/4" from the center diagonal line (both sides), cut down the center (between the stitching lines), pressed open and trimmed the sort of square to a perfect 2" square (to finish at 1 1/2"). They were then laid out and pieced together using a scant 1/4" seam. Mostly I pressed to the dark side when pressing the HSTs open, except for the corner squares in Peace and Plenty. The pressing worked much better if those squares were pressed to the light side (so the seams nested together when piecing the two squares together).

62 Old Windmill

60 Noon and Light - Marti Michell templates - Background pieces are (finished sizes) 1 1/2" squares (A-5), 1 1/2" QST (A-7) and 1 1/2" HSTs (A-6) in the center. Red triangles are also 1 1/2" QST (A-7). For the diagonal strips I used a 3" HST and then cropped the corner with A-7.

58 Mother's Dream - I used a border print for the background green bit and wanted the lines in it to go around the block, so I pieced the corner HSTs using two QSTs. Marti Michell templates where I could and templates from EQ when I couldn't (the rectangles). The center square is a 3" diagonal square (A-3), large setting triangle is a 3" QST (A-4) and the corners would be a 1 1/2" HST (A-6), but I pieced together two 1 1/2" QSTs (A-7) instead.

47 Homemaker - I used templates I printed from EQ, put double sided tape on the back of the template, placed it on the fabric and used a small rotary ruler placed with the 1/4" line on the seam line to cut. I did mark the seam lines so I could do the Y-seams. (I showed this block before, but it was a terrible picture!)

46 Hill and Valley - more Marti Michell templates, the large triangles are 3" HST (A2), the green HSTs are 2" HST (B-13), the smallest green triangles & brown triangles are 2" Quarter square triangles (B-14), and the square on the diagonal measures 2" on the diagonal (D-28).

45 Grape Basket is a Five patch block, so I paper pieced it.